

Designs on fabric are one of the best ways to make a simple piece of fabric look more beautiful and attractive. There are many exciting tie and dye techniques to create a print and pattern on fabric. It has become an integral part of the fashion industry and without any design on the fabric, an outfit can look boring and plain.
You can create designs on a fabric with the help of various printing techniques, embroidery, tie & dye techniques and much more. In this article we will have a close look at the different techniques of tie & dye. It is one of the most love and fun to do fabric painting. You can try this at your home and it is simple too. Let’s have a look at the different tie & dye techniques one by one:
1.Crumple Tie & Dye Techniques
This technique of tie & dye is very popular and perfect for beginners. You can spot this design on various clothes. As it is a simple technique, you can try it at home. Choose the fabric on which you want to create this design and lay it on a flat surface. Use your fingers and begin scrunching the fabric. Continue until you have everything in a crumpled mound. Secure the mounds tightly with a rubber band. Use the dye of your choice and apply it over the fabric. Flip the fabric and repeat the same process on the other side too. Let it dry and then open the rubber bands and dry it again in the sun. Your print is ready to use.

Image Source- Depop
2.Shibori Tie-Dye Techniques
The Shibori technique of tie and dye is more intricate and detailed when compared to the modern techniques of the tie and dye. It is a Japanese process which uses strings and other folding methods. Lay the fabric on a flat surface and start folding it in an accordion fold from the bottom. Now accordion fold it again from the other side and wrap it tightly with a rubber band.
Criss-cross the rubber bands which will help the fold to stay in place more securely. Shibori generally uses indigo dye, so you can go with that or have your own preference. Apply the dye on the exposed areas. Make sure that the fabric is damp while applying the dye. Now place it in a sealable plastic bag for 6-8 hours. Once the dye has dried, carefully cut away the rubber band. Rinse, wash and dry the fabric and it’s ready to use.
3.Ice Tie & Dye Techniques
You don’t need to mix up all your dyes to get the cool ice look on your fabric. You can let the ice do the work to produce a unique watercolour tie-dye effect. Wash your fabric and leave it damp. Now scrunch it up and secure it using rubber bands. Place the fabric on a wire rack and cover it completely with ice-cubes. Now apply dyes of your choice on the top of the ice. You can add as many colours as you like. Sprinkle powder generally all over the ice. After the ice melts, keep the fabric in the sealable plastic bag for 7-8 hours or overnight. After the fabric has absorbed the dye nicely, cut out the rubber band and wash and dry the fabric. Dry it and it’s ready to use.
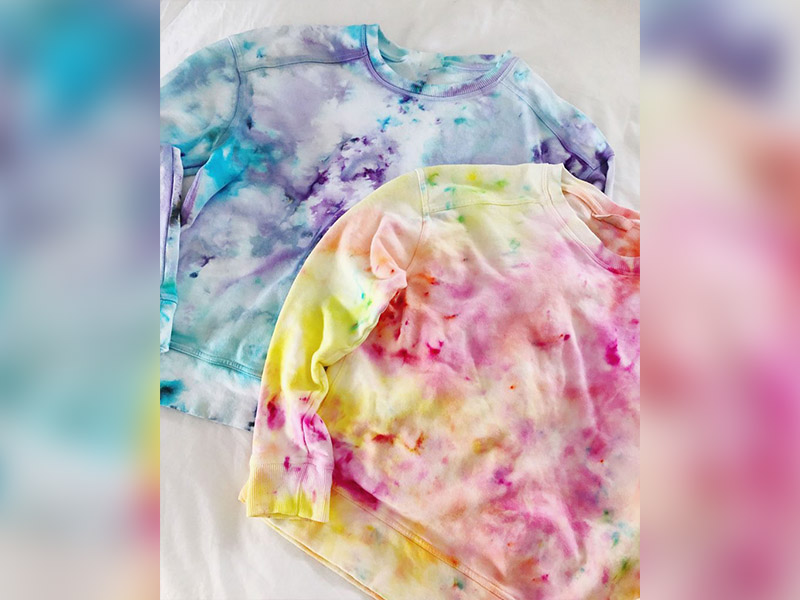
Image Source- The Neon Tea Party
4.String Tie & Dye Techniques
If you want to create a slightly different effect then you can use strings instead of rubber bands. Shape the damp fabric in your desired tie & dye pattern. Tie a string tightly and secure it with a knot. Cut off the excess string left after securing the knot. Apply the dye as per your choice and let it dry. After the dye has dried up completely, cut out the strings carefully before washing the fabric. Your fabric is ready to use.
5.Firecracker Tie & Dye Techniques
Firecracker effect is one of the most loved and popular designs made using tie & dye technique. To create this design you need to scrunch a damp t-shirt in a tube shape and tie it with a rubber band about a third way down from the top. Repeat the same on the bottom third. Add dye on the top and bottom third. Let the dye dry completely. After that remove the rubber band carefully. Rinse the t-shirt and it is ready to use.

Image Source- Mod Min Lifestyle
6. Horizontal Stripes Tie and Dye Techniques
Horizontal stripes never tend to go out of fashion. They are one of the most loved fabric patterns and have been in trend for a long time. To create horizontal stripes on a fabric using tie and dye technique you will need a t-shirt, colours of your choice, wire rack, elastic bands and sealable zip bags. Lay the t-shirt on the flat surface.
Start folding the fabric in a series of 1 inch accordion folds. Alternate the folds back and forth like you used to make a fan during your childhood. Now secure the folds using the elastic bands. Make sure you place the bands at the space of one or two inches. Now use different colours for every section to create stripes. Leave the fabric to dry. Make sure that the fabric is wet before you apply dyes over it. After the fabric is completely dry remove the elastic bands carefully. Rinse the t-shirt and it is ready to use.

Image Source- J&JP
7.Diagonal Stripes Tie and Dye Techniques
Stripes are evergreen fashion trends and diagonal stripes give a unique look to your dress. Being one of the most loved fabric designs, diagonal stripes go well with tie and dye patterns. You can easily create this pattern at your home. Before you start creating, have the necessary tools at your disposal. The equipment that you’ll be needing are- wire rack, white t-shirt, dyes, elastic bands and sealable zip bag. Now wet the t-shirt and squeeze out the excess water from it. Lay the t-shirt on a flat surface and start folding it in accordion folds of 1 inch.
Start folding from the bottom-left corner. Alternate the folds back and forth like you used to make paper fans during your childhood. When you come near the sleeves that part can be tricky but try to keep it in sync with the fold. After folding is done, secure the folds tightly using elastic bands. Have an even space of 1 to 2 inches between each band. Now fill in different coloured dyes in different sections to create stripes. Now place the fabric in the sealable zip bag and let it dry completely. After the fabric is dry, remove it from the bag and carefully cut out the elastic bands. Rinse the t-shirt and it is ready to use.
8.Square Box Folds Tie and Dye Techniques
Square box tie and dye effect gives a very cool and casual look. You can easily make this pattern at your home. Before you start creating, have the necessary tools at your disposal. The equipment that you’ll be needing are- wire rack, white t-shirt, dyes, elastic bands and sealable zip bag. Now dip the t-shirt in water and squeeze it nicely so that the fabric is damp. Now lay the t-shirt on a flat surface and start folding it from the left side. Go lengthwise while folding the fabric and try to fold it in accordion fold. Keep each of your folds between 3 to 4 inches. Now press the edges of each fold firmly so that sharp creases are created. Now start folding the fabric widthwise and try to keep each fold between 3 to 4 inches.
Make sure that each of the fold is of the same size be it lengthwise or widthwise. After you have completed folding the fabric widthwise, the resulting bundle will be in the shape of a square. Now cut a square cardboard of the same measurement and sandwich the fabric with it and secure it firmly using elastic bands. You can either dip the bundle in the dye or spray the dye over the bundle. Keep the bundle in the sealable zip bag to dry. After the fabric is completely dry, remove the cardboard pieces and cut out the elastic bands carefully. Rinse the t-shirt and it is ready to use.

Image Source- ashley c. chin
9.Triangle Box Folds Tie and Dye Techniques
Triangle box tie and dye pattern is very easy to create and looks very chic and stylish. This style is somewhat similar to the square box folds technique. Before you start creating, have the necessary tools at your disposal. The equipment that you’ll be needing are- wire rack, white t-shirt, dyes, elastic bands and sealable zip bag. To create this shibori-inspired triangle folds you need to wet the t-shirt and then lay it flat on a smooth surface and start folding it from the left side. Go lengthwise while folding the fabric and try to fold it in accordion fold. Keep each of your folds between 3 to 4 inches.
Now press the edges of each fold firmly so that sharp creases are created. Now fold the t-shirt up in the triangle. Fold it forward first and then backwards at 45 degrees in a triangle shape. Repeat until you get a triangular bundle. Now cut a triangle cardboard of the same measurement and sandwich the fabric with it and secure it firmly using elastic bands. You can either dip the bundle in the dye or spray the dye over the bundle. Keep the bundle in the sealable zip bag to dry. After the fabric is completely dry, remove the cardboard pieces and cut out the elastic bands carefully. Rinse the t-shirt and it is ready to use.
10.Mandala aka Kaleidoscope Tie and Dye Techniques
Mandala or kaleidoscope tie and dye is one of the coolest effects that can be created using the tie and dye technique. For creating this look, you’ll need to create a design using multiple lines in symmetry. After creating the lines you will need to fold the fabric in wedge shape and use coloured dye the way you want to and use any combination of colour. Once you unfold the fabric you will get a nice and unique kaleidoscope pattern over it. To create this mandala tie and dye pattern you need to have all the materials at your disposal.
The equipment that you’ll be needing are- wire rack, white t-shirt, dyes, elastic bands and sealable zip bag. Lay the wet shirt on a flat surface and fold it in half lengthwise and then fold it again widthwise. Now you have a piece of fabric folded into a quarter in front of you. Now diagonally fold the fabric two times. You have now folded the t-shirt into eighths. Fold the shirt again into half diagonally and now you have folded the t-shirt into sixteenth. You can take the help of a video to understand every procedure properly.
Secure the folds tightly with the elastic bands. Now use various colour dyes of your own choice to create your unique design. Keep the bundle in the sealable zip bag to dry. After the fabric is completely dry, remove the cardboard pieces and cut out the elastic bands carefully. Rinse the t-shirt and it is ready to use.

Image Source- Reddit
There are few tips that you must keep in your mind before you start the tie & dye technique. Let’s have a look at them one by one:
- Make sure you spend quality time on bundling and folding the fabric. This plays a major role in making effects and patterns on the fabric. Don’t do this process in a hurry else you won’t be able to get the desired results.
- The folds help you create a line in the pattern. If you want to create smaller patterns, keep the folds narrow and if you want to create larger patterns, go for wider folds.
- Make sure that the rubber band you use is really tight. This will not only help keep the fabric secure but also avoid the dye to spread to the different parts.
Many institutes are teaching a Fabric Designing Course as it is gaining immense popularity lately. Hunar Online Courses offers a Fabric Designing Course where you can use your creative skills and create different types of designs. You can make use of your creativity and get a perfect pattern and design according to your needs. You can enrol in our Online Fabric Designing Course. It has easy video classes which are accessible every time and you can learn from anywhere. You also get 24/7 faculty support which will help you clear your doubts.
So, what are you waiting for? Join Hunar Online Courses and start paving a new path to your career.